How to Import & Export Large & Massive Mysql Database on Shared Hosting & Localhost? – Working
It is very easy to work on small size of Mysql Database. But, on the other hand somewhere it’s tough to manage Database with more than 100K records. Today we are showing you the best way to handle Export & Import of large MySQL database.
We will go through all process in Scenario wise:
Scenario 1: Our website and database is live on Shared Hosting and our Database size is more than 500M.
If you want to export whole database through PHPMYADMIN interface in one go. Then it is almost not possible due to lack of configuration in my.ini file in shared hosting. It always breaks your download file and you will not get all data in your exported database sql file.
Note: Always check the whole database on local and match the rows count in table before importing some other location / server.
Recommended Process:
In Shared Hosting, there is a backup functionality under Files.

Click on Backup and start to take fresh backup.


When backup will be prepared, you can download whole zip file or partial database backup also.

With this backup way, we will get whole database backup quickly.
This is the major challenge almost all server admin or developer face who work on Shared Hosting.
Scenario 2: Want to import Heavy Database on Local Server.
Whatever backup you have downloaded, it is very important to check that MySQL Database is correct or not. So, we need to import that heavy or large database in our local server (XAMPP/ LAMPP/ WAMP).
Through the PHPMYADMIN interface, again it is almost impossible to upload such a huge file .sql through import functionality.
Here, I will recommend using few Tools.
Tool 1: MySQL Workbench
It is a professional tool and generally use in big enterprises to manage and handle MySQL & MariaDB.
Install MySQL Workbench and start to connect with new connection.

Note: Make Sure you mysqld service is active and running on your Server / System
In the Management tab, click on “Data Import / Restore”.
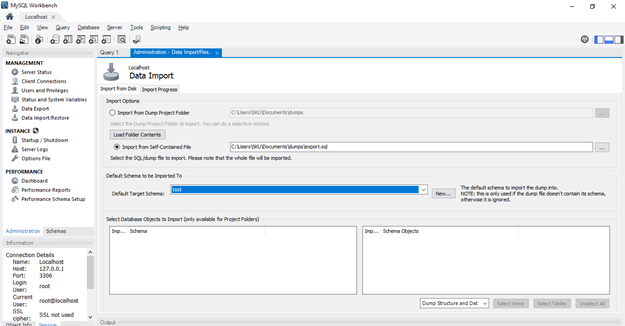
Select the path where you have placed .sql file and Select schema (DB)

In the next tab, Click Start Import and process will start.
You can use MySQL Workbench to manage Cloud based Hosting like AWS.
Scenario 3: Upload / Import large database on shared Hosting.
In shared hosting, again it is almost not possible to import heavy database through PHPMYADMIN interface. And you cannot use MySQL Workbench here because shared hosting never provides Public Instance or Host to access Database.
So, here we are going to use another tool.
Tool 2: adminer.php (single file)
Download this adminer.php file and upload it on your shared hosting anywhere through FTP.
Access the adminer.php file on browser.

Login through credentials.

Here you will get import options.
I would suggest using “From Server” option.
Upload your sql file at same location where you have placed adminer.php file on Server.
Rename the sql file to “adminer.sql”
And, just click “Run File”
Also, always uncheck Stop on Error
When you will uncheck, it means import process will not be stop after any error. It may take time, but definitely it will import your whole database.
Recent Comments